Lesson 4 - Sync with GitHub Desktop
In this lesson, you will use GitHub Desktop to interact with your repository using your local file system. Ensure that you’ve sucessfully installed GitHub Desktop.
Table of Contents
- Lesson Objectives
- Lesson Video
- What’s the point of GitHub Desktop?
- Clone your repository to your computer
- The GitHub Desktop Interface
- Make some changes on your local repository
- Commit new changes
- Push changes to your GitHub remote repository
- Make changes in the GitHub remote repository
- Pull changes to the local repository
- Key Points / Summary
GitHub does not officially support GitHub Desktop for Linux users. The community made a Linux compatible fork, but do keep in mind that it’s unofficial. You will still be able to learn about Markdown, GitHub, and GitHub Pages without using GitHub Desktop. If you’d like to learn how to use GitHub with local development, check out our module on Git.
Lesson Objectives
- Clone your GitHub repository to your local machine
- Use GitHub Desktop to control file versions on your local computer
- Push changes up to GitHub (and pull new changes back down)
Lesson Video
The following video demonstrates each of the steps outlined below in text.
What’s the point of GitHub Desktop?
You might have found it tedious to create or upload files in GitHub, especially since you have to do it one by one! With GitHub Desktop, you’ll be able to work with the files in your repository as if it were just a folder on your desktop. You’ll also be able to commit changes to multiple files within the same commit.
Clone your repository to your computer
In this step, you will clone your existing GitHub repository to your local computer so that you can work on files locally.
Forking vs Cloning
The terms “forking” and “cloning” can get confusing, since both of them seem to create a new repository. There is a key difference however.
- Forking a repository creates a duplicate of that repository on your GitHub account. Changes made to the forked repository do not affect the original repository.
- Cloning makes a local copy of a repository on your own computer. It’s like a download, where your changes remain local to your computer. You can later decide whether you want to sync up this clone with your GitHub remote repository.
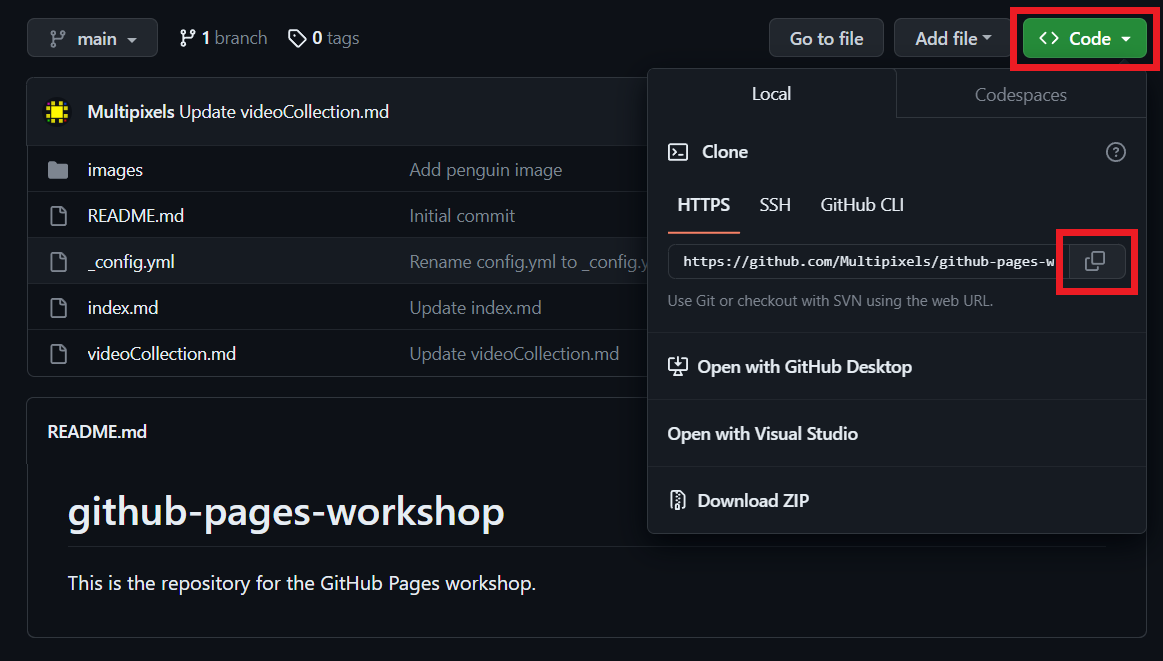
In GitHub
- In the top-level of your GitHub repository click the green
<> Codebutton. - Copy the https code (e.g.
https://github.com/Multipixels/github-pages-workshop.git)
In GitHub Desktop
Make sure you’ve followed the steps outlined in Preperation to set up GitHub Desktop.
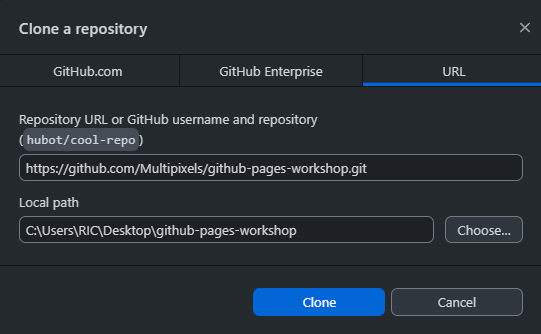
- Go to
File > Clone repository.

- Select to add by
URLand paste the copied URL to your GitHub repository. - Choose a folder on your local computer where you want to download the repository contents–a new folder will be created with the name of the repository.
- Click
Clone.- NOTE: You can also use this approach to clone someone else’s GitHub repository!
The GitHub Desktop Interface
We will quickly go over the different elements in the GitHub Desktop interface.
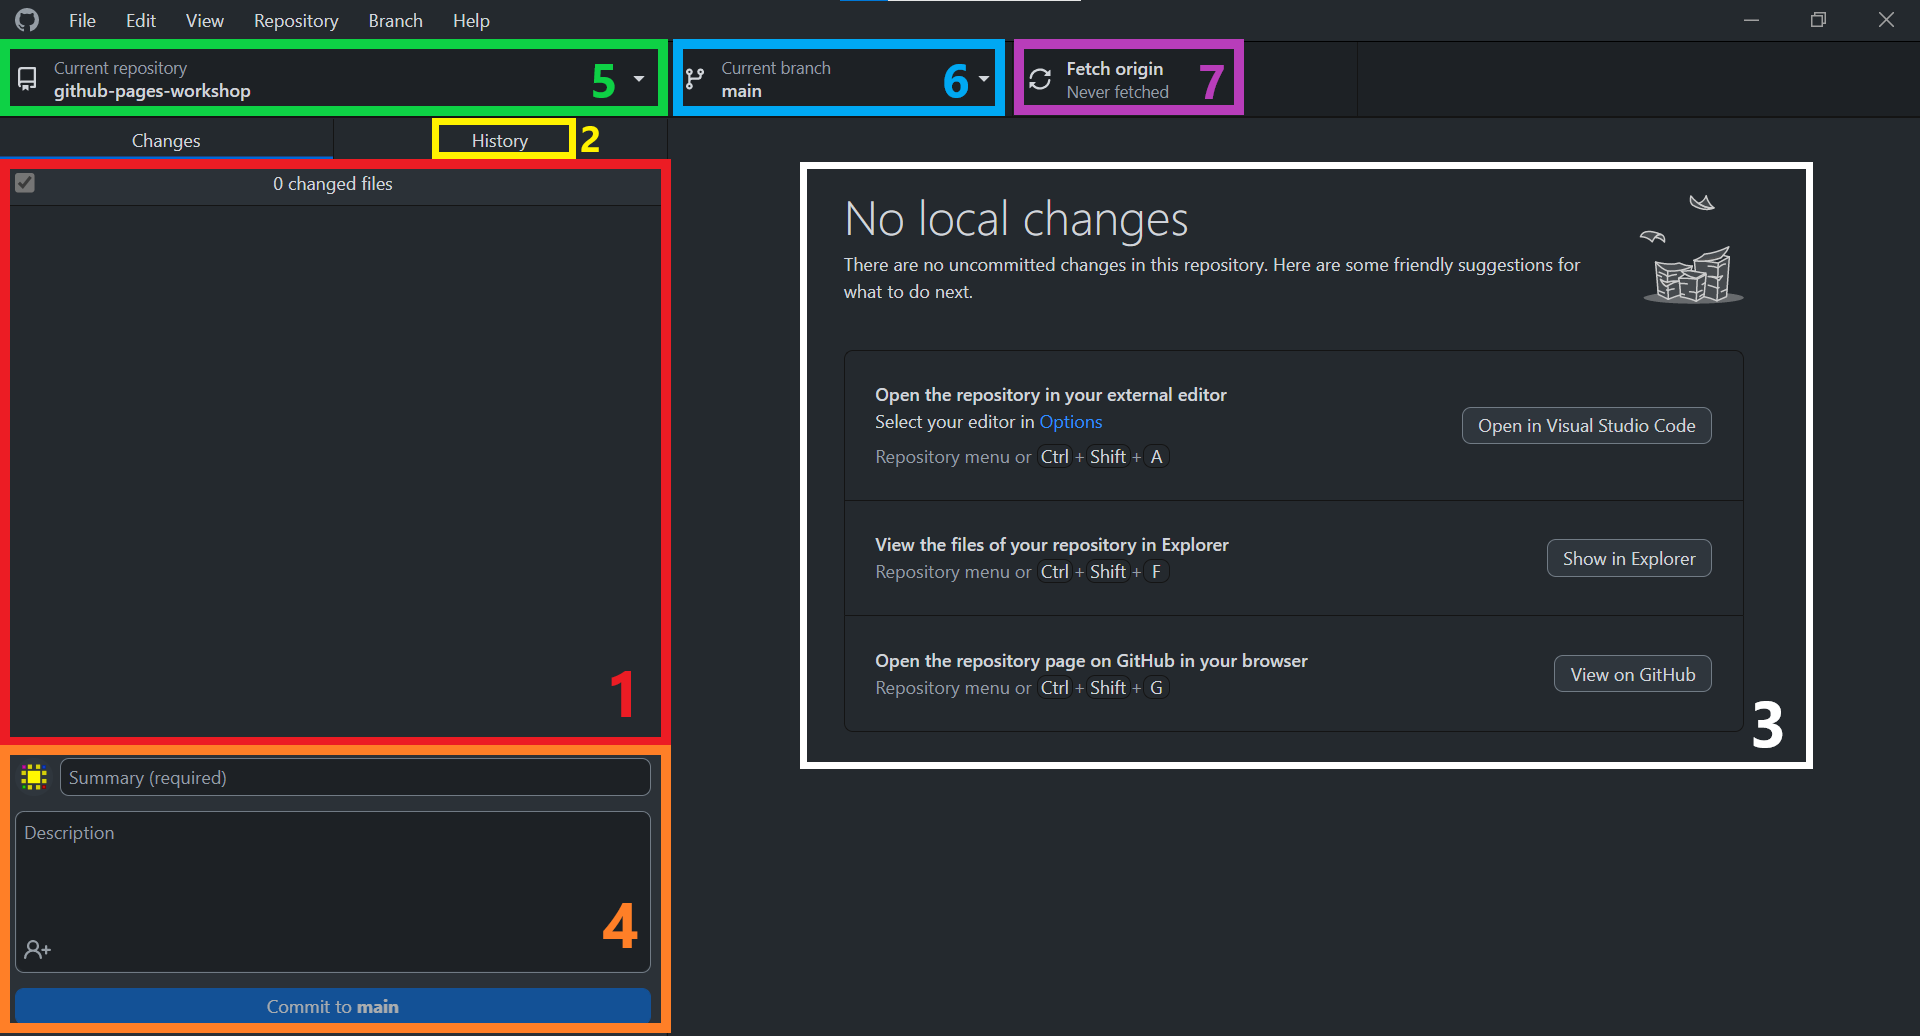
- In the red rectangle (#1), we can see all the changes we’ve made to the repository files since the last commit. Since this a freshly cloned repository, there are no changes to show.
- Clicking on the history button in the yellow rectangle (#2) will show you the history of all the commits in the repository, much like how GitHub does.
- When you do make changes, they’ll be highlighted on the right side in the white rectangle (#3).
- Then, you’ll be able to commit your changes by providing a commit summary with an optional description in the orange rectangle (#4), just like in the GitHub interface.
- At the top left, in the green rectangle (#5), you can see a list of all your cloned repositories on your computer and select which one you want to work on.
- To the right of that, in the blue rectangle (#6), you can select what branch you’re working on.
- To the right of that, in the purple rectangle (#7), this is where you pull and push your changes.
Currently, you have a local repository on your computer and a remote repository on GitHub.
- Pull
- The local repository on your computer will sync with GitHub by downloading any changes made to the remote repository.
- Push
- The local repository on your computer will sync with GitHub by uploading any changes made to the local repository.
The typical workflow is to pull all changes before starting to work on your project, make your changes, commit your changes, and then push your work to GitHub. Doing this correctly will prevent any version conflicts of files.
Make some changes on your local repository
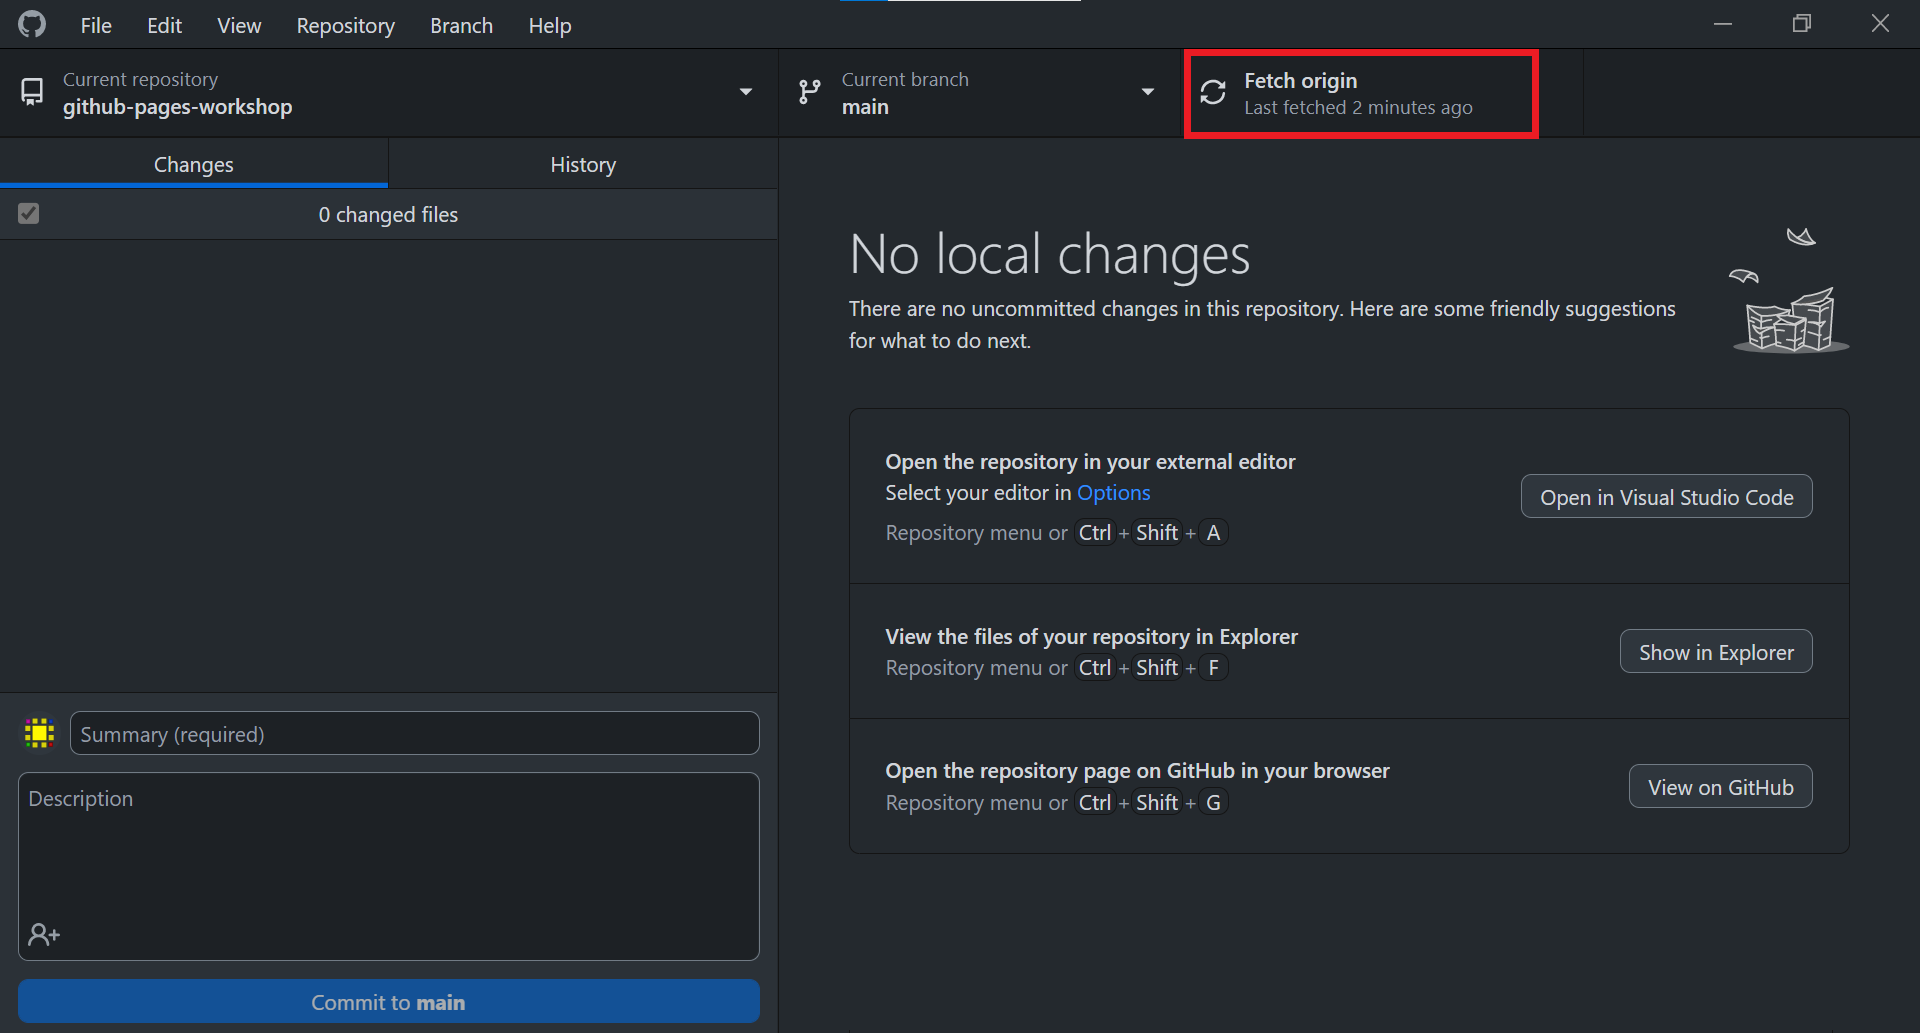
- Of course, before making changes, we want to pull.
- To pull, click on the “Fetch Origin” button at the top. If there’s any changes to pull, it’ll now say “Pull Origin”. If it says that, click on it again to pull the changes. Otherwise, continue to the next step.
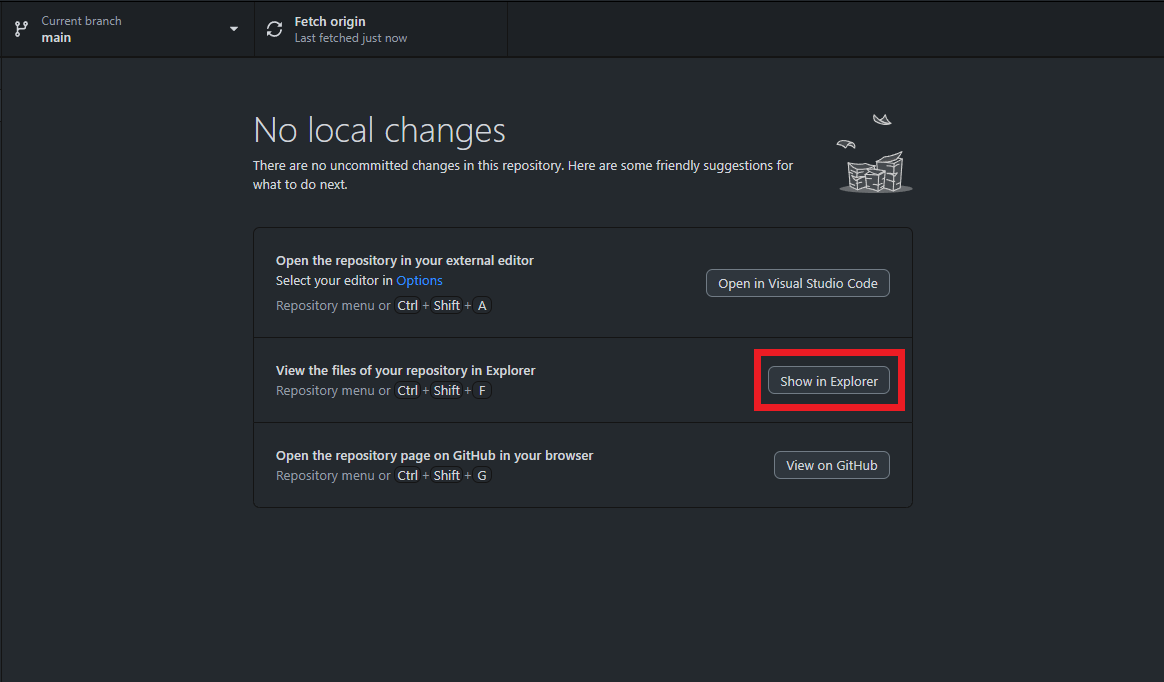
- Click on the
Show in Explorerbutton (or use theCtrl+Shift+Fshortcut) to open up your file explorer.
- Edit or create a Markdown file.
- Make any other changes you’d like to see appear on your website.
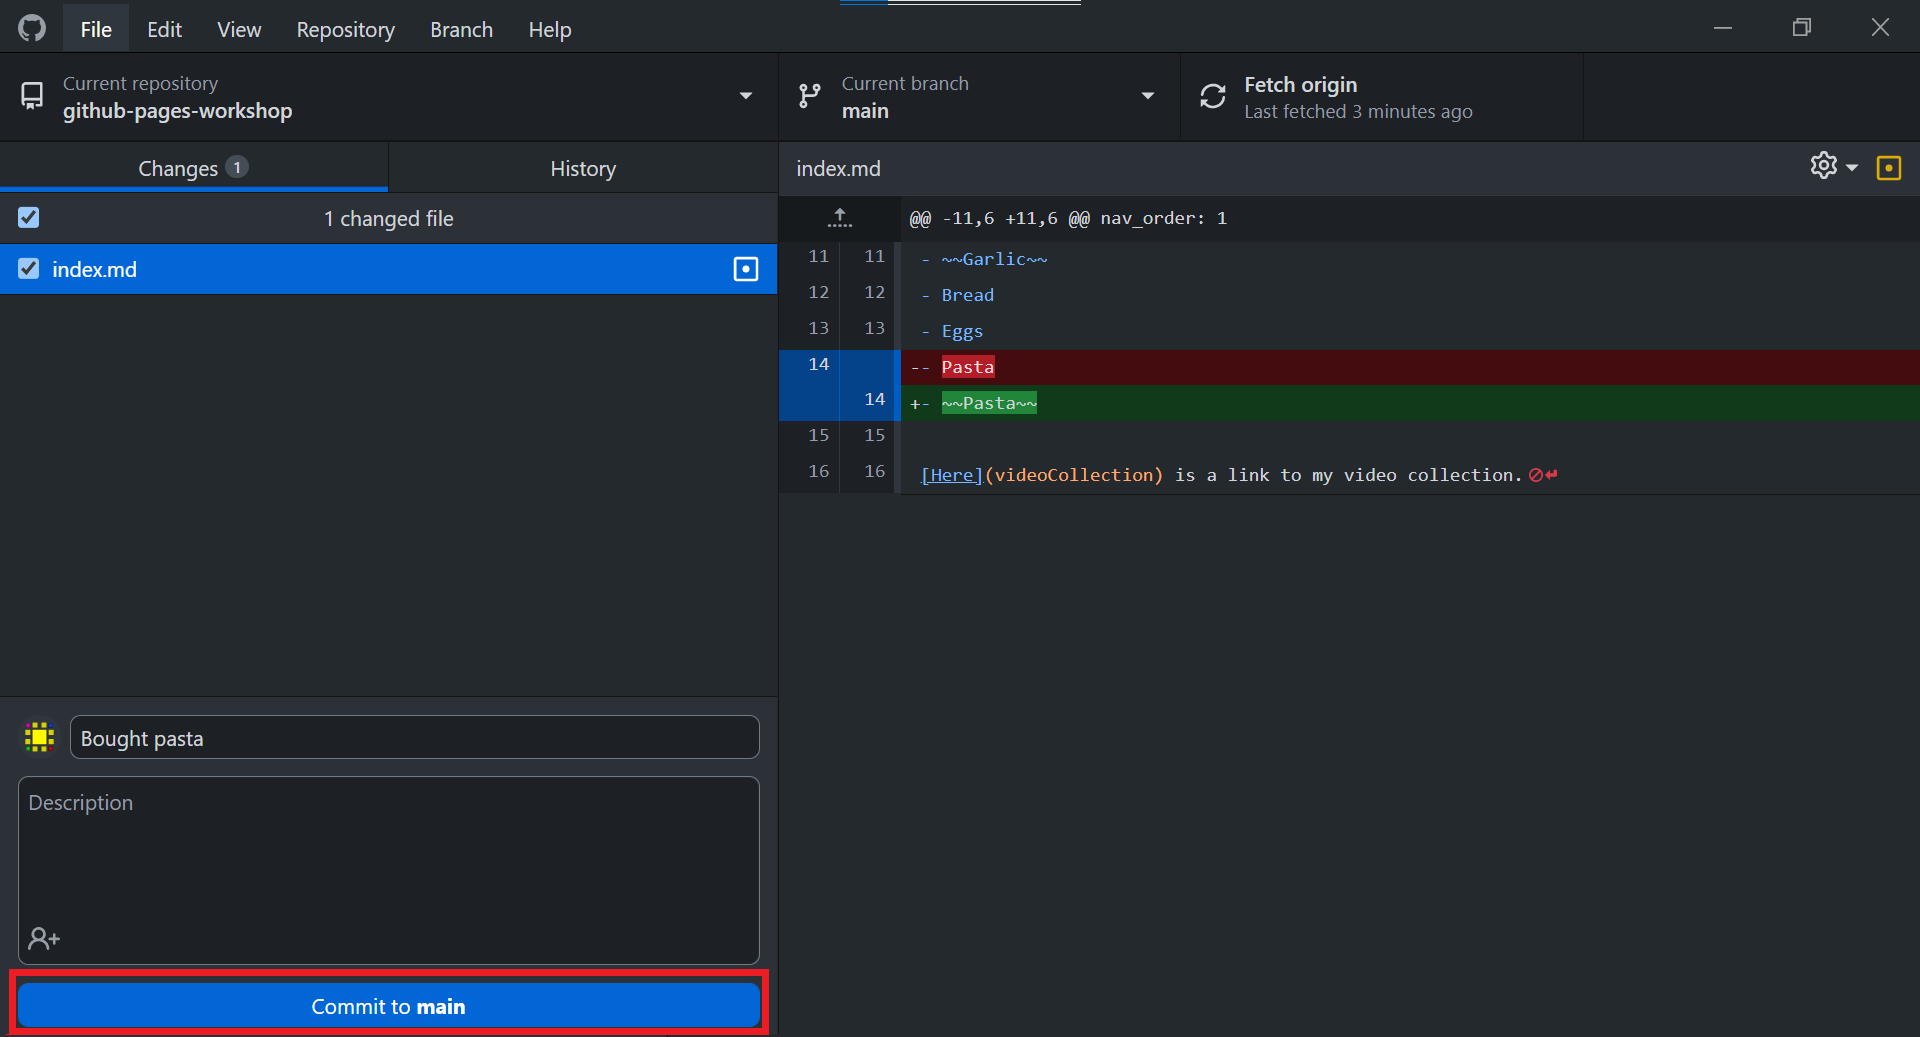
Commit new changes
- In GitHub Desktop, you should be shown the files that have been changed, and be able to view the specific changes.
- If you are comfortable with the changes, you are ready to commit them.
- Provide a summary of the changes (or used the suggested text), and lengthier description, if desired.
- Click
Commit to main. This commits your changes to your local repository (but not yet to your GitHub one!). - If you continue to work on your local files, you will need to again commit changes.
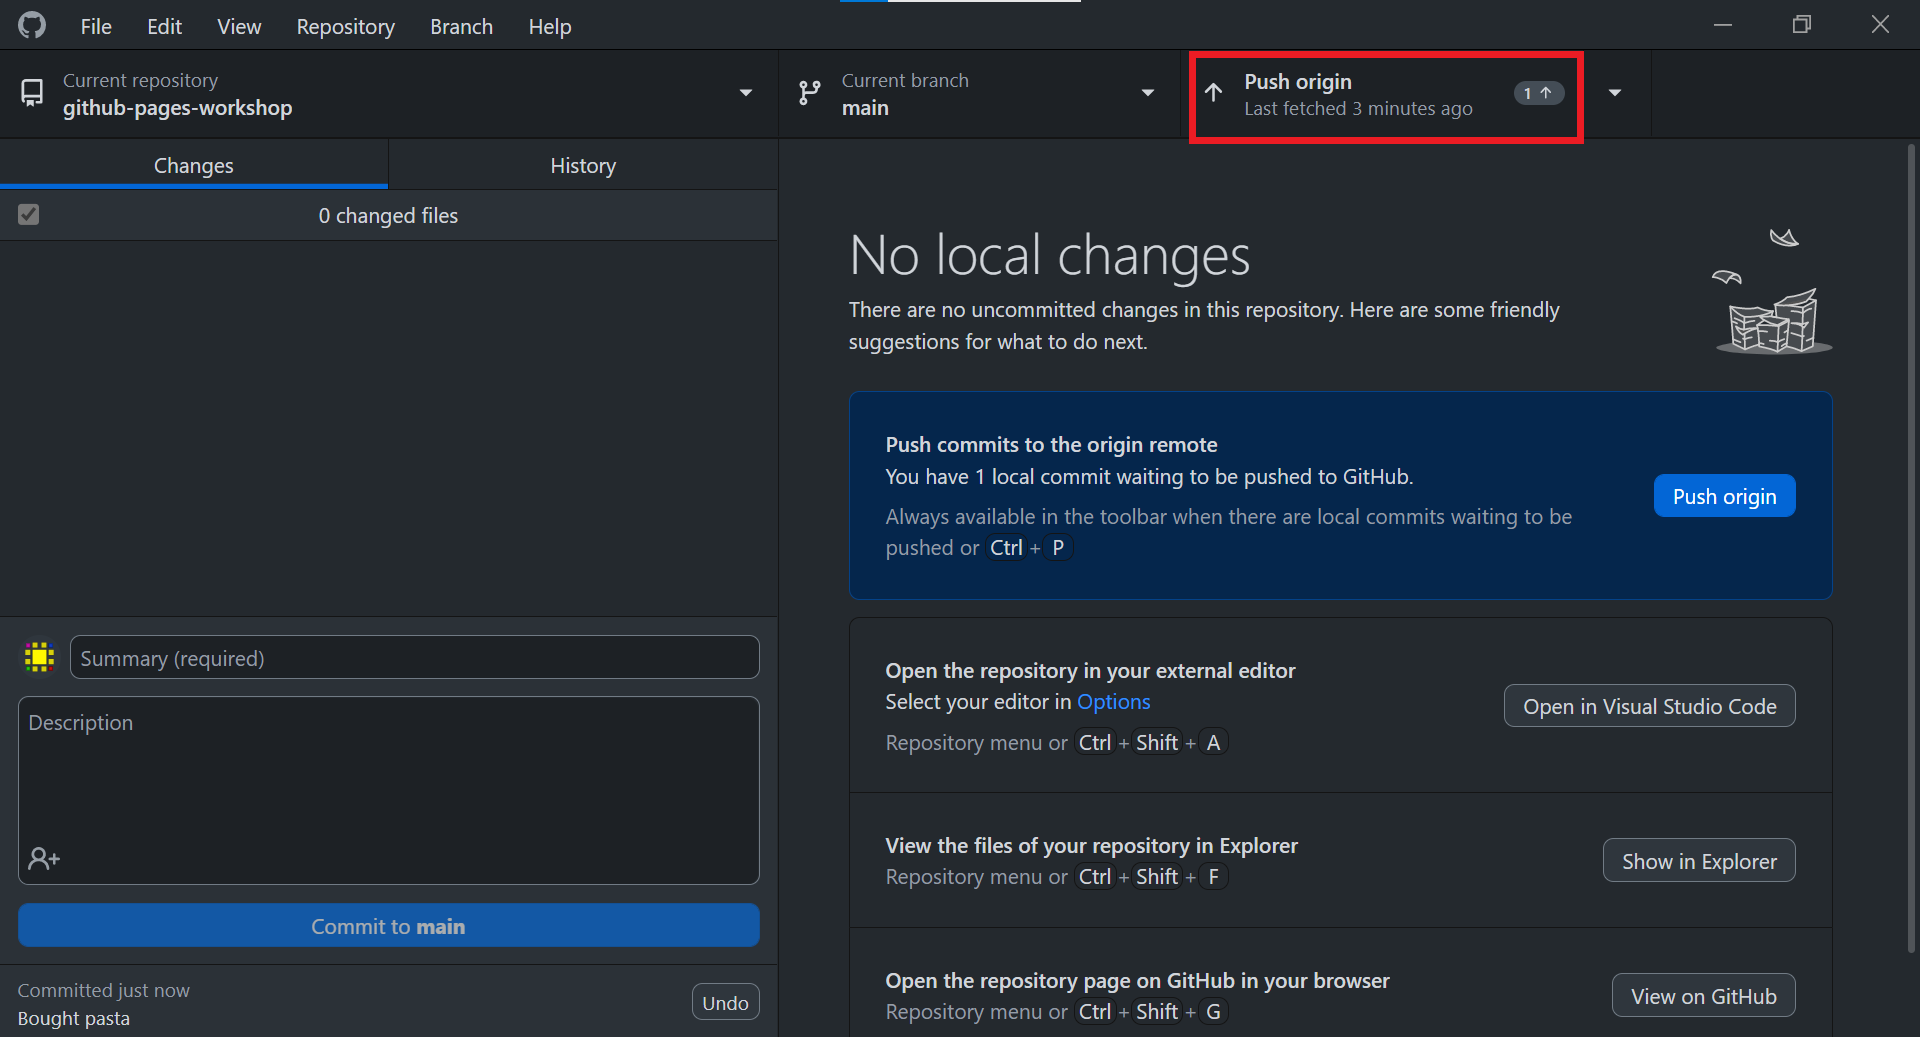
Push changes to your GitHub remote repository
In this step, you’ll push your local changes back up to your GitHub repository, so that both are synced.
- In GitHub Desktop, click the
Push originbutton to send your changes to your GitHub repository. - You can go back to your repository on GitHub to verify your changes.
Make changes in the GitHub remote repository
To demonstrate how to pull, let’s make a change in the remote repository.
- Make and commit a change to a file in the GitHub remote repository using the web editor.
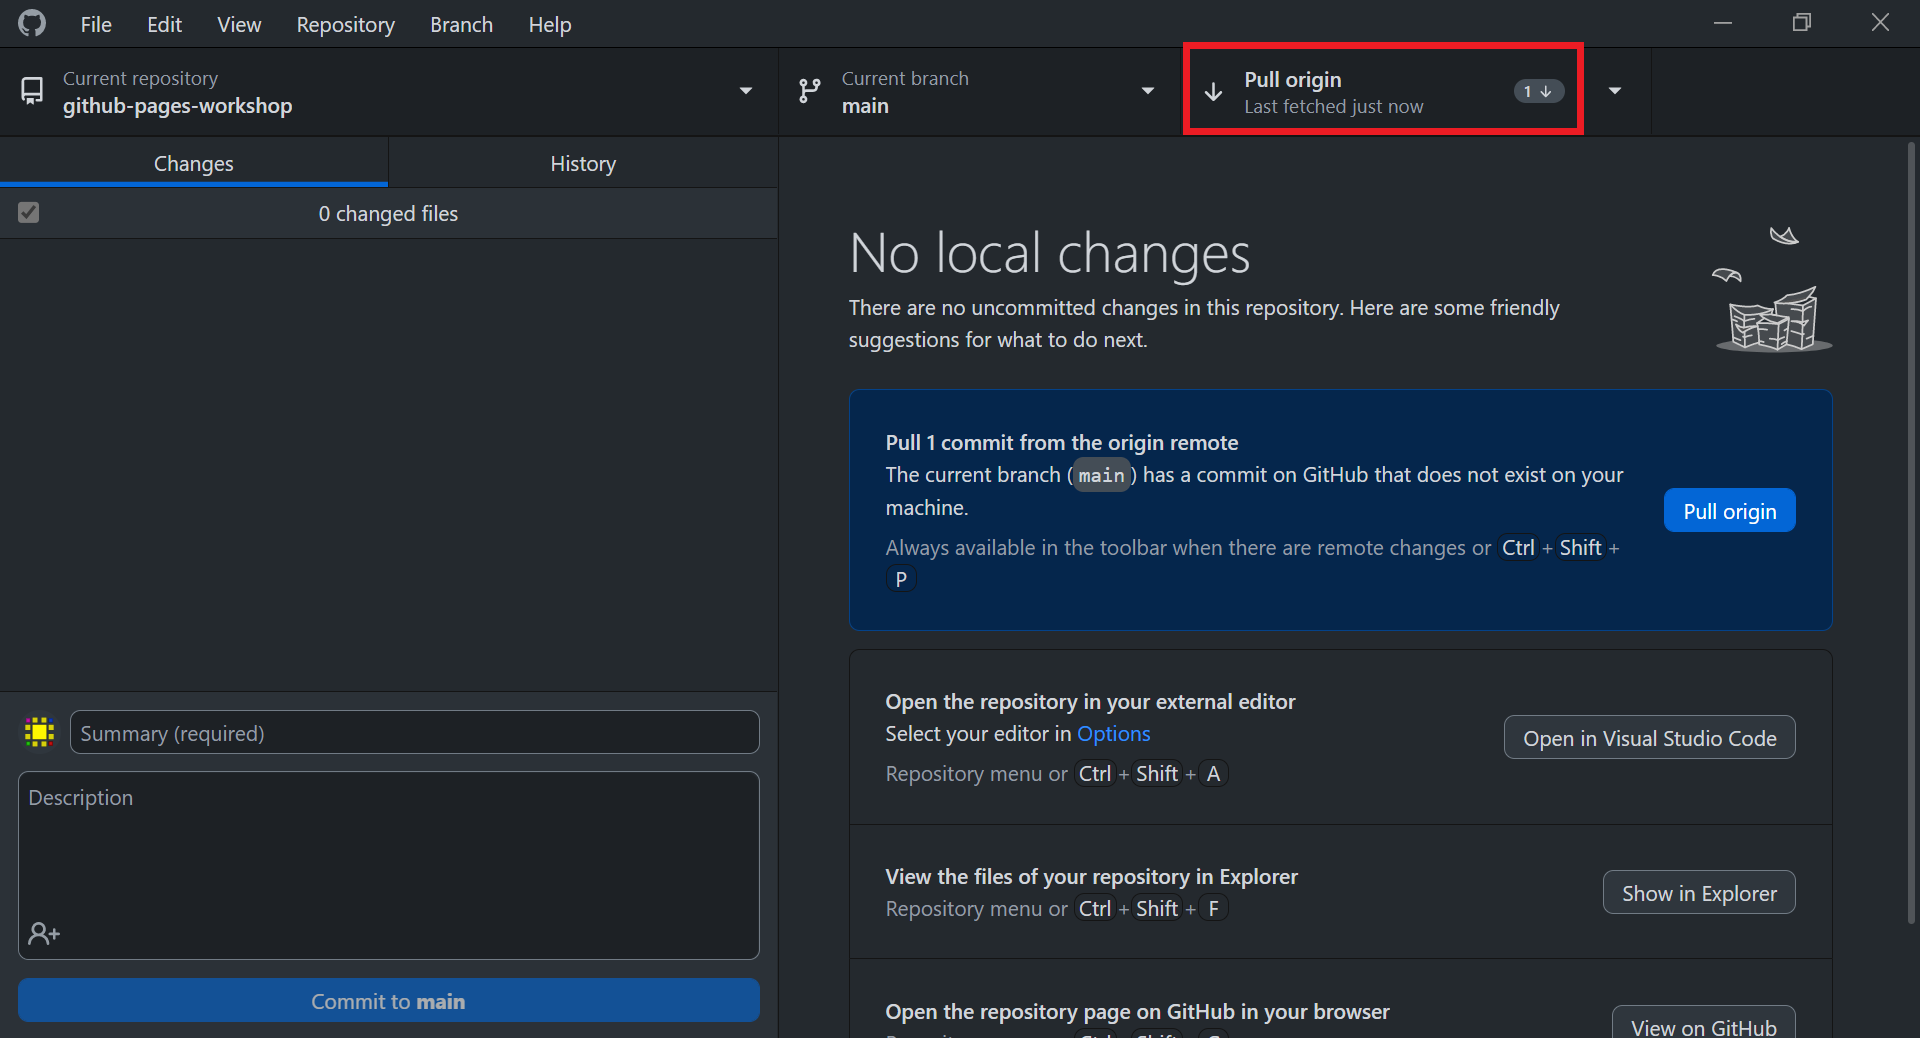
Pull changes to the local repository
- In GitHub Desktop, click the Fetch origin button. This will check the GitHub repository to see if any changes have been made remotely.
- In GitHub Desktop, click the Pull origin button to sync remote changes to your local files.
Key Points / Summary
- You can clone remote repositories from GitHub onto your local file system using GitHub Desktop.
- You push changes up to GitHub, and pull new changes down to your local repository.
- The general workflow is to pull changes, make changes, commit changes, push changes.